Adobe Illustrator Tutorials Vector Tips & Tricks Search related topics..


SELECTION TOOLS


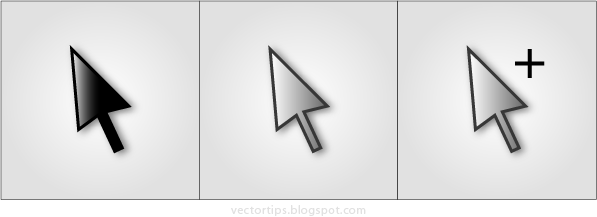
There are 3 types of selection tool in Adobe Illustrator used to select objects or shapes. I prefer to name it as follows:


Black Arrow


Selection Tool (V)
  • Select the whole object / shape
  • Select grouped objects
  • Select object(s) to re-size / rescale the object(s)
     

White Arrow


Direct Selection Tool (A)
  • Select 'path' segment of an object / shape
  • Select 'anchor point' of an object
     

White Arrow +


Group Selection Tool
  • Select the whole compound of an object / shape
  • double click will Select grouped objects
     
Note:
I prefer to ignore the name given by adobe illustrator, it sounds confusing users.. just mention Black Arrow, White Arrow & White Arrow + (plus) instead..


How To Use It
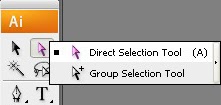


First we need to get familiar where these Selection Tools in Adobe Illustrator work space. As you can see (in your Adobe Illustrator) there are only 2 Arrow icons shown; the Black Arrow & White Arrow shown.. and there is a small triangular dot at White Arrow tool icon to indicates there is another tool hidden - simply click & hold for 2 seconds to show another White Arrow + tool. So we get 3 Selection Tools..


Black Arrow (V) to select the whole objects or the grouped objects.

Use White Arrow (A) to select an anchor point or a path segment of an object, used to edit the anchor point of the object.
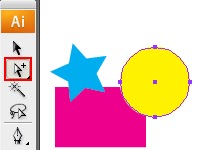
White Arrow with + to select a whole compound of an object. What's the different (compared to Black Arrow) is, if the objects was grouped, it will only selects one compound of a shape.
Tips: To select the whole group, you don't need to change to Black Arrow, simply double click one of the object and it will select the whole group just like the Black Arrow.



ZOOM & HAND


Zoom Tool (Z)


Select in toolbox for zoom in & zoom out.

for zoom in :

  1. click on image, or
  2. click (hold) & drag over the image

  1. fast shortcut for zoom in without deselecting other tools, (with other tool active), keyboard Ctrl + Spacebar hold & zoom in then release keyboard.

for zoom out :

  1. click on image
  2. fast shortcut for zoom out without deselecting other tools, (with other tool active), keyboard Ctrl + Alt + Spacebar hold & zoom out then release keyboard.
  3. zoom 100% = double click or keyboard Ctrl+1
  4. zoom all = double click or keyboard Ctrl+0

Hand Tool (H)


To scroll the artboard around without using vertical / horizontal scrollbar.

    1. Toolbar - select
    2. Click on any area & drag to move the document around.
    3. Fast shortcut for hand without deselecting other tools, (with other tool active), keyboard Spacebar (hold), cursor will change to , click (mouse) & drag document.


      ← Previous - 02 Getting Started | Next - Drawing Basic Shape →


      This tutorial, we will look at the Illustrator Work Space, the Tools and Palette that commonly used in working with Illustrator. So first, create a new document, study the environment - the Tools on the left, Palette on the right and Control Panel on the top. But most important are the Tools (left) & Palette (right).


      WORKSPACE - TOOLS, PALETTE


      Create New Document


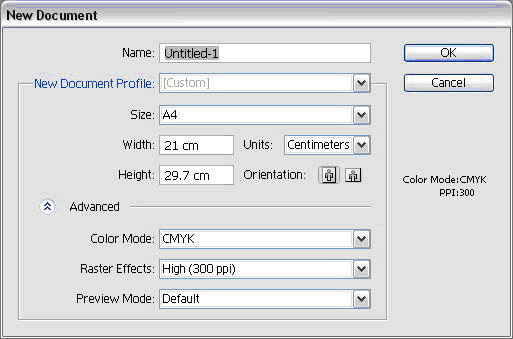
      Go to File > New Document to create your first document. Type in a Name for the document and click Advanced to select RGB for Color Mode as we will be working for the screen. Click Ok after that.

      Note :
      • CMYK Color Mode - for printing job purpose (i.e. brochure, letterhead, name card, etc.)
      • RGB Color Mode - for jobs to be displayed on screen (i.e. for website design, video editing)
      • Size document (A4 as shown above) will be the artboard size for the new document
      • Set the Units – points / inches / mm / cm, etc.
      • Orientation either portrait or landscape
      • Size, Units & Orientation can be changed at anytime in the middle of your works, go to File > Document Setup

      Illustrator Workspace


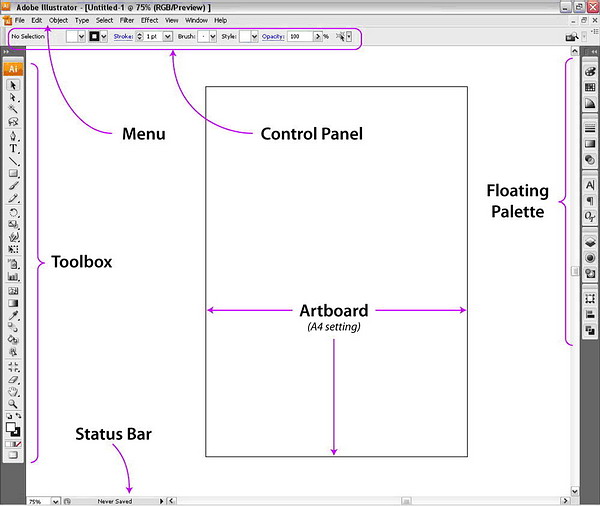
      You’re advised to familiarize the Illustrator Workspace, there are 4 main features of the workspace besides the canvas itself.

      1. Toolbox - the tools that we will used

      2. Menu - the standard features for any applications

      3. Control Panel - display the properties of selected tools & artworks

      4. Palette - Holds the properties of the artworks - to modified, change colors, stroke, etc.

      Toolbox


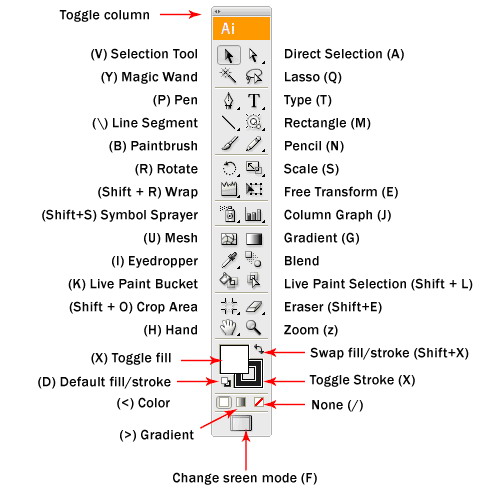
      This is the handy toolbox which we will use most often. By default, it comes in one single column (collapse) as shown in the screenshot above. To switch it back to the old style 2 columns toolbox, simply click the top left mini arrow >> to toggle it into 2 columns. Some of the tools like Rectangle have more tools hidden. To expand, just click and hold the icon to reveal all the similar tools under that group.


      Expandable Tools indicated with small arrow


      Click & hold the selected tool to expand the extra tools


      Toolbox with 2 columns view, the functions & the shortcuts indicated in bracket.

      Floating Palette


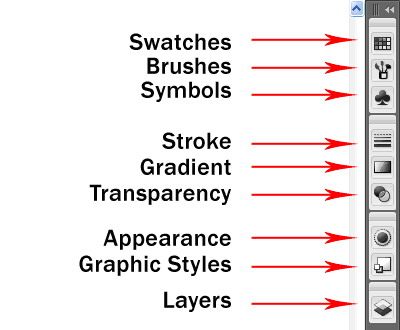
      This is the floating palette which contains properties for our artworks. It is commonly used for changing colors, stroke width, artworks size, effect, etc.


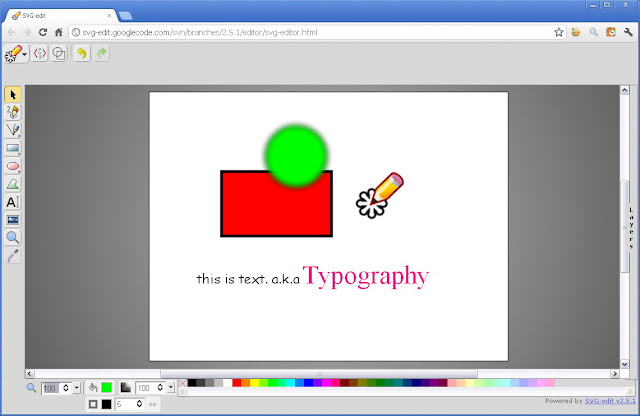
      SVG or Scalable Vector Graphic is the only vector graphic or vector image that has the ability to appears on screen, online. Unlike other vector graphics format sucah as Ai, CDR, EPS that unable to be appear live onscreen in the internet, just a link instead. Except SWF or flash format, but the different is SVG is 'static vector image' and SWF (flash) format are normally video or animation and the good point is SVG image that shown online are downloadable. Here is one of SVG editor project by a SVG-edit group using free Google code service, an open source for developer.


      This open source SVG-edit project was driven by javascript (JS), HTML5, CSS and SVG.. yes sounds so internet because this is an online version of SVG-edit. just make sure you're using modern web browser to launch the site. You can find the download version via their Project Home. Since I'm an Adobe Illustrator user, I don't use it for my vector edit, so I prefer you try it yourself. Still it's a good program for fast and light editing for web vector.

      Let see the features it offered:
      • Free-hand drawing
      • Lines, Polylines
      • Rectangles / Squares
      • Ellipses / Circles
      • Polygons / Curved Paths
      • Stylable Text
      • Raster Images
      • Select / Move / Resize / Rotate
      • Undo / Redo
      • Color / Gradient picker
      • Group / Ungroup
      • Align
      • Zoom
      • Layers
      • Convert Shapes to Path
      • Wireframe Mode
      • Save drawing to SVG
      • Linear Gradient Picking
      • View and Edit SVG Source
      • UI Localization
      • Resizable Canvas
      • Change Background
      • Draggable Dialogs
      • Resizable UI (SVG icons)
      • Open Local Files
      • Import SVG into Drawing
      • Connector lines and Arrows
      • Plugin Architecture
      • Smoother freehand paths
      • Editing outside the canvas
      • Increased support for SVG elements
      • Add / Edit Sub-paths
      • Multiple path segment selection
      • Support for foreign markup (MathML)
      • Radial Gradients
      • Configurable Options
      • Eye-dropper tool
      • Stroke linejoin and linecap
      • Export to PNG


      Well not bad, though the program interface seems very basic. I intended to compare it with some of other free Vector Editor available online. Perhaps next time I'll try to make some basic comparison in features, let me collect some other free vector editor first. Anyway go to their Project Home SVG-edit and for Short Introduction to learn more.


      credit: ehmdunque.altervista.org
        Have you ever wonder which vector file format is the good option to save for public sharing..?


        As we may see on some websites that giving free vector files, they provide a few types of format for the vector file to download. The options just for different software users normally Adobe Illustrator, CorelDraw, PDF, EPS, etc. Here I show the comparison between saving as Ai vs EPS file formats as image shown below. Why Ai & EPS.. well I'm talking about saving vector files using Adobe Illustrator.. and which format is better, Ai or EPS. CorelDraw don't have to worry they normally accept Ai file, but not vice versa.


        Look at the image above, the first file in the image shown is Ai file and the 3 EPS was saved differently (using Illustrator CS5) with EPS - CS3, CS5 & v.10 settings. They're not much differ among the 3 EPS files with different settings when saving it. But saving the same file as Ai format reduced the file to much smaller in size. Therefore I always prefer to sharing vector files in Ai file format.

        Why EPS file format is bigger than Ai..?


        In term of file size, I can't really tell specifically, perhaps EPS file format saved more information technically, due to widely supported vector file format to be read or open by most graphic software. So it takes more bytes with EPS, (I guess). But in the other hand, Ai file format is specific and it doesn't need 'extra bytes' (my assumption, lol).

        Why Ai file format is better..?


        These are the points I want to share about the advantages Ai vector file format:
        • Ai is smaller in size.
        • Ai is supported by many popular graphic software, paid version & free open source.
        • Ai is the industry standard in design & printing (any design firm will have the application).

          Tips to make the Ai file smaller.


          Ok here is the saving setting normally I used to keep Ai files small in bytes, near 10 times smaller..!!


          Whenever you want to save vector file in Adobe Illustrator, make sure the save option setting:
          • File > Save As > Save > Illustrator Options (as image shown above)
            > Disable the 'Embed ICC Profiles' > Ok
          This will reduce your file size significantly, compared to 'Embed ICC Profile' enable, when saving.
          For normal use, enable 'Embed ICC Profiles' just wasting the file capacity, imagine you deal with 100mb of Ai artworks, you might reduce +/- 90mb of the size probably. (Unless you really deal with ICC Profiles for the jobs).

          Choosing legacy version when saving the file for sharing to public or to output for printing is recommended. These will make sure no version conflict when the other machine using different Illustrator version.

          Am I missing something, share some tips that you know with us ;)


          Brush is one of the important element in Digital Illustration's artwork using Adobe Illustrator. We might be familiar with those ready made Brushes available in the software since the previous versions of Illustrator. But are they enough for variety of artworks or creativity..? Sure we will always love to download free Brushes available on the net. But there are plenty of it and most of them not suites our needs, some we don't have the time to preview or to know the results. Then the idea to customise our own Brushes for specific artworks is a good decision.

          Here are one of the comprehensive tutorial explained how to create Brushes profile width to be use in any Illustrator CS versions. The Brushes profiles shown as below..


          View from the source


          credit: vector.tutsplus.com | img brush: zcool.com.cn


          Converting a Pantone color to CMYK in Adobe Illustrator is just a click away.. but how to convert CMYK to Pantone color..? Before that, why we need to convert CMYK to Pantone color, you asked..? As designer, sometimes we need to have only spot color(s) in our artwork. Or perhaps a design that needs a specific color other than CMYK it self, so the extra spot color is needed in the artworks. Yes it means the artwork holds more than 4 colors, CMYK + Pantone.

          So here is the Tips on How To Convert CMYK To Pantone in Illustrator the easy way in this video tutorial.


          An another guide on How To Convert CMYK To Pantone clearly explained in text & images tutorial below..


          View the Tutorial..


          credit: vector.tutsplus.com & 4networking.biz
          Happy 25th Anniversary Adobe Illustrator ☺. Since 19 March 1987 it was shipped and being in the market, as the first software application for a 5 years old company. Well I just knew that Illustrator is the first software by Adobe.. and it was change the way designers and artist do their jobs. The Vector Application then conquer the industry. Read the story more from adobelife blog.
          Here are all the Adobe Illustrator's Splash Screen since the 1st version of the software till now. The woman image is a painting - 'The Birth of Venus' by Sandro Botticelli.


          The Birth of Venus (Illustrator must be female) lol..

          1987: Adobe Illustrator 1.1

          1988: Adobe Illustrator 88

          1991: Adobe Illustrator 3

          1993: Adobe Illustrator 5.0

          1996: Adobe Illustrator 6.0

          1997: Adobe Illustrator 7.0

          1998: Adobe Illustrator 8.0

          2000: Adobe Illustrator 9.0

          2002: Adobe Illustrator 10

          With new optimized software's engine & the new name, CS (Creative Suite)
          2003: Adobe Illustrator CS

          2005: Adobe Illustrator CS2

          Re-branding looks great
          2007: Adobe Illustrator CS3

          2008: Adobe Illustrator CS4

          extra dimension - perspective included
          2010: Adobe Illustrator CS5
          what next.. Ai CS6 on the way.. let see ; )


          src & img credit:
          • https://www.facebook.com/media/set/?set=a.10150625558263226.394954.64138473225&type=1
          • http://blogs.adobe.com/adobelife/2012/03/21/happy-25th-adobe-illustrator/
          A good artworks or visual designs need both combination of Vector & Raster graphic editor. That is the purpose and the differ between Adobe Illustrator & Adobe Photoshop, that many users still don't really understand 'why Adobe creates (and Designers using) both of it. Every time (non designer) asked me about these two graphic design software related and their purpose, I replied; "It's something like, why God creates woman when man can handle this world themselves". (Do we..?)

          Illustrator & Photoshop is like male & female (doesn't matter who's male & who's female in this case)☺ Sometimes we need to use Photoshop to completes Illustrator works and vice versa. Same goes to female that completes male, right..♥ Anyway, I'm talking about the 'communication' it should goes between these 2 software 'in action'.

          Ok lets say we done doing some (unfinished) artworks with Illustrator and there are some Layers in the Ai files, we need to transfer the job to Photoshop, with all the Layers and Texts editable in Photoshop. Simply Export the files from Illustrator to Photoshop.

          File > Export > Photoshop (psd)

          Well, I'm sharing this simple Illustrator Tips on how to do it.. please read from the source


          via: twitter.com/wegraphics
          src & img credit: http://wegraphics.net/blog/tutorials/illustrator-quick-tip-exporting-files-to-photoshop


          ----------


          Here another Tips on working with..

          Ps to Ai & Ai to Ps


          Read from the source: Illustrator files in Photoshop & Photoshop file in Illustrator


          src & img credit: http://creativefan.com/photoshop-illustrator-integration-tips/
          author
          vectorism
          designer, illustrator, founder of vectorise.net