
Adding Transparency
You can add transparency in Illustrator by lowering the opacity of objects so that underlying artwork becomes visible. Go to (top menu) Windows > Transparency to open up your Transparency Window. Draw and stack a few objects and set it to a lower opacity of 50% for the underlying color to show through.| Transparency Panel shows Normal setting & 100% Opacity (the bottom image should write "ON LIGHT BACKGROUND") |
| Transparency with 33% Opacity (the bottom image should write "ON LIGHT BACKGROUND") |
Blending Modes for Objects
Blending modes in the Transparency panel, creates some different color effects of overlapping objects. Blending modes let you vary the ways that the colors of objects blend with the colors of underlying objects. Some example of blending modes setting and effects as shown below in 2 different background.| Transparency, Blending mode - Multiply (the bottom image should write "ON LIGHT BACKGROUND") |
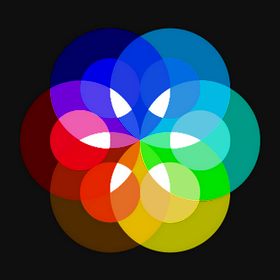
| Transparency, Blending mode - Screen (the bottom image should write "ON LIGHT BACKGROUND") |
| Transparency, Blending mode - Overlay |
| Transparency, Blending mode - Different |
You can experiment all the settings available with difference colors of background, and see the effects.
Button Reflection Using Screen Effect
Screen blending mode is one of useful effect to create reflection effortlessly. Shown below is a popular technique on creating a button reflection using Screen.
1. First draw a circle and apply a Gradient Fill of light to dark orange to it.
2. Draw another circle on top and apply another Gradient Fill from black to white.
You can see the black portion in step 2. being 'transparent'.

Hello,
ReplyDeletethanks for the article ! very interesting.
I've been playing around with the blendings and realized that if i make some nice effect in RGB when i convert the artwork in CMYK for the print colors are changing a lot.. is there a way to get the colors obtained in RGB when printing ? Thanks !
so far there is no way to obtain the nice RGB blendings effects exactly in CMYK mode..
ReplyDeletethe graphic software developer still not able to solved this problem #LOL..
actually the reason of color effects changing from RGB mode to CMYK mode, is due to the inability of (CMYK) Ink or Toner printing media which made of liquid or powder in producing 'rich colors'..
while in the RGB mode the colors are rendered with combination of Red+Green+Blue 'LIGHT', not INK / Toner.. so Light rendering can consists million of colors and can event renders 'blending effects'.. not like Ink that not really (or less) support in color effects..
answering your question -
"is there a way to get the colors obtained in RGB when printing?"
my advise, if u really need the colors / blending effects in RGB for printing, first Save the colors (the artwork) in RGB as master file, then Export the RGB color effects artwork as PNG (or Jpeg) image to be use in CMYK printing work..
i normally use this method, yes the PNG (or Jpeg) image might slightly change, but not as much as if u direct convert from RGB to CMYK.. and i don't know any other way so far..
hope that u understand my explaination :)