Adobe Illustrator Tutorials Vector Tips & Tricks Search related topics..


As the name given, Illustrator Type Tool is to type text and it also has sets of 7 typing tools with their own functions. Click & hold on Type Tool icon to show another 6 type tools.


Shown here is the Adobe Illustrator CC Type Tool - click & hold the icon to show all the 7 sets of type tools.

We will try to focus more on these top 3 tools:
  • Type Tool
  • Area Type Tool
  • Type on a Path Tool
The other tools (except the new Touch Type Tool) are similar with the top 3 tools, just in vertical orientation.
..

Type Tool

1. Normal text

To type normal text on artboard. Click Type Tool or shortcut T and click on empty area on artboard.


Note:
The text will be free flow as you type, press Enter to break to second line or to make new paragraph.

2. Text Box

To type text in a compound box so that the text will only fixed in the box.
Click Type Tool or (T), click & drag a box with desired size on empty area on artboard, and start typing. This is similar with the next tool - Area Type Tool.
A


← The box made by dragging the Type Tool, and type. Text will only visible with the box size.
Note:
To resize the box, use Selection Tool (black arrow) and pull out one of the box’s side. Do not use Free transform, your text will distorted.


Area Type Tool


To type text in a compound box so that the text will only fixed in the box.
Create a box or any shape, use Area Type Tool and click on the path of the box or the shape.

1.

With Area Type Tool, click on the path of the box or shape area, and you’re ready to type.
..

2.

This small red square mark indicates there are hidden overflow text inside the box. Resize the box area to see full text.
..

3.

Use Selection Tool  (black arrow) and drag the middle small square, to resize the box area to show overflow hidden text.
..

Area Type Tool - Options

You can customise Area Type Tool with option settings, like to make the Text Box with 2 or more rows or make it 2 or more columns complete with gutter (spacing) settings.

1. Make an empty box and use Area Type Tool to click on the path of the box.

..

2. Start typing your contents.


..

3. With the text box still selected, double click the Area Type Tool    icon to show the Options.


..

4. Add Rows
  • Rows: 2
  • Gutter: 0.25 inch
 
..

5. Add Columns
  • Columns: 3
  • Gutter: 0.15 inch
  • Span: 0.9 inch
    (Span is automatically set, when we set the Gutter value)


Type on a Path Tool


To create a Text that follows a path shape.
Draw a curvy path using Pen Tool (P), use Type on a Path Tool & click on the path.

1.


Draw a curved path line and use Type on a Path Tool    to click on the path, and start type.
..

2.


The text will follow the path shape. Once done, deactivate it using (click)  Selection Tool 
Set the text Paragraph to Align center.
..

3.


Using Selection Tool, you will see there are ‘controller handles’ on both sides & in the middle.
These handles can be drag to control the text flow.
..

4.


So the text moves and fill the path nicely. Now use Selection Tool    to drag the middle handle controller downward.
..

5.


The text flip downward, this is usefull for Type on a Path of a Circle - Outside text or Inside text.
Or..
You can also use Type on a Path Options. Make sure the type on path is selected, double click on icon    to open the setting.


Tick the Flip & Preview, done.
..

6. Text Outside


Same method with Step 4 - 5 above for Type on a Circle Path, use ‘black arrow’ (Selection Tool) to drag middle handle
..

7. Text Inside (Flip)


The text Flipped inside.
..

8. Rotate


Drag the ‘middle handle’ along the path to move the text to the bottom..
Or..
Just Rotate the circle 180º.
..

So these are the most common used for Type tools in Illustrator since the previous versions. For the new Touch Type Tool, I will add in here next time, hopefully.


Adding Transparency

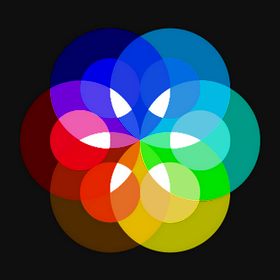
You can add transparency in Illustrator by lowering the opacity of objects so that underlying artwork becomes visible. Go to (top menu) Windows > Transparency to open up your Transparency Window. Draw and stack a few objects and set it to a lower opacity of 50% for the underlying color to show through.

Transparency Panel shows Normal setting & 100% Opacity
(the bottom image should write "ON LIGHT BACKGROUND")

Transparency with 33% Opacity
(the bottom image should write "ON LIGHT BACKGROUND")

Blending Modes for Objects

Blending modes in the Transparency panel, creates some different color effects of overlapping objects. Blending modes let you vary the ways that the colors of objects blend with the colors of underlying objects. Some example of blending modes setting and effects as shown below in 2 different background.

Transparency, Blending mode - Multiply
(the bottom image should write "ON LIGHT BACKGROUND")

Transparency, Blending mode - Screen
(the bottom image should write "ON LIGHT BACKGROUND")

Transparency, Blending mode - Overlay

Transparency, Blending mode - Different

You can experiment all the settings available with difference colors of background, and see the effects.

Button Reflection Using Screen Effect

Screen blending mode is one of useful effect to create reflection effortlessly. Shown below is a popular technique on creating a button reflection using Screen.

 
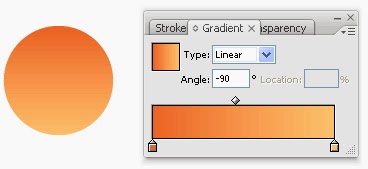
1. First draw a circle and apply a Gradient Fill of light to dark orange to it.


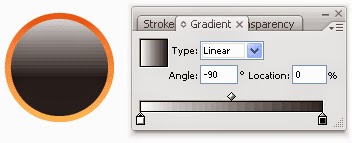
2. Draw another circle on top and apply another Gradient Fill from black to white.


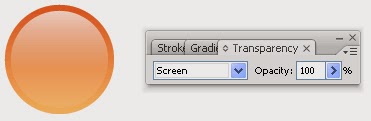
3. Finally, select the black to white circle and change the blending mode to Screen. And you’re done!

You can see the black portion in step 2. being 'transparent'.

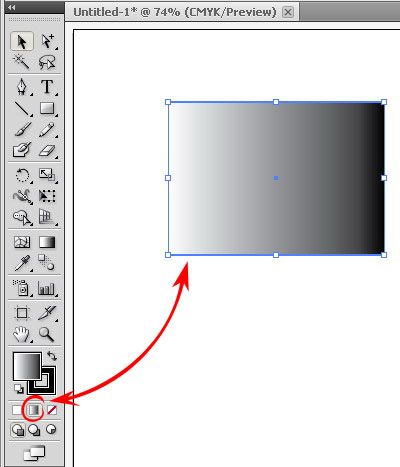
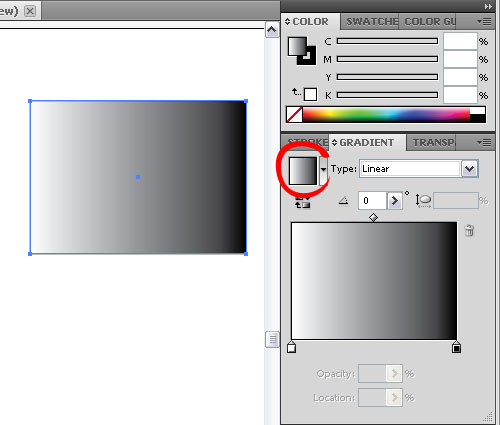
Gradient is a combination of 2 or more color fills in Linear or Radial direction. There are a few ways to apply Gradient fill - via Tool Palette, Gradient Palette or (keyboard) shortcut >.


Apply Gradient via Tool Palette


Select your artwork object, click the Gradient Fill icon as shown above.

Apply Gradient via Gradient Palette


Object is selected, go to Gradient Palette, click the Gradient icon (as shown above).
Note: If the Gradient Palette is not there, open at top menu > Window > Gradient. Or keyboard shortcut is Ctrl+F9 (Win), Cmd+F9 (Mac).

Change Gradient Color

Now your artwork / object Filled with Gradient, with default black & white greyscale (1 color). We need to change this default in order to color it.


Select your object (you want to change)..
1. go to Gradient Palette, see the Gradient Slider, click the Black Slider
2. go to Color Palette, click Option (top right corner) as shown above


3. Change from (default) Greyscale to RGB (or CMYK if you need so)


4. Adjust the color, any color you like (suddenly I remember Pink Floyd song.. lol). Now your object's gradient color changed.


5. Then you need to do the same steps for the second Slider - the white gradient color.

Now you know how to change the Gradient Color of your object. Next we try to adjust the Gradient Style.


Change Gradient Style

You need to experiment yourself with these basic methods on how to modify and control your Gradient Fills on your artworks.

Linear Gradient

The steps we learnt above is Linear type of gradient, and we can adjust the Slider Location to modify the effects.


Drag the Sliders and see your object gradient's effect changed.


Now change the angle direction as shown above.. try it.

Radial Gradient

Simply change the Type to Radial as shown in the image below


See your object fill color now is Radial Gradient.

There are some more extra things we can add to this Gradient Fill, but what we have learn here are just the basic of Gradient in Illustrator. We can add more colors to the gradient's object by adding more than 2 Sliders, such as rainbow colors. We can also make the gradient in different styles than this 2 basic types, but that would be more complicated for newbie.. we can try it later hopefully ☺


Note:
This tutorial is based on Adobe Illustrator CS5. Legacy version (CS4 and below), newer version (CS6 and CC) might be differ than images shown and methods in this post. I'm trying to make it as compatible as possible for any version. Therefore some new & extra features or technics that not available in previous versions might not be shown here to avoid some users confusing.
The difference in vector graphic or vector images compared to pixel type of images or raster images (jpeg, png, bmp, gif, psd, etc.) are the rendering method used by the graphic applications itself such as Adobe Illustrator. Normally any vector graphic editor used Fill & Stroke, to render and shaped the graphic art. There will be no pixel created, rendering done by mathematical value of the software engine. Therefore vector graphics are always high resolution and scalable to any size at the same time remain the byte size.


After you master the Pen Tool and Shape Tools tutorial, you should know the core of vector graphic - Fill & Stroke, because this is the main element that will inspire you on how to create vector illustrations, how to fill colors, gradients and playing with stroke.


Fill
  • The Color inside the compound of a graphic shape.
  • 2 types of Fill colors, Solid and Gradient Fill.

Fill Color using Swatches

To fill an object, open up your Swatches Palette. Select your object and pick any color from the swatches.

Fill Color using Color Picker


Another way to fill color is by double clicking on the Fill in your Tool Palette. A Color Picker window will appear and you can pick your color.


Stroke

  • Path or the outline created (using Pen Tool or other drawing tool) that formed the graphic shape.
  • Stroke is actually the value of path when it applied with color & thickness value.
Adding Stroke & Fill using Control Palette

You can also easily change fill, stroke color and stroke weight by accessing your Control Palette at the top of your artboard.

Stroke Styles - Caps


The Stroke Caps determine the start and end points of a stroke. This applies to open paths only. You can choose between a Butt, Round, or Projecting cap.

Stroke Styles - Miter Limit


The stroke’s Miter Limit specifies the appearance for the joins in a shape. Notice how the joins look after we applied different miter settings to the stars.

These are some very basic knowledge to know about Fill & Stroke. On the next post later we will come back to show more on how to make Fill Gradient for your artworks.


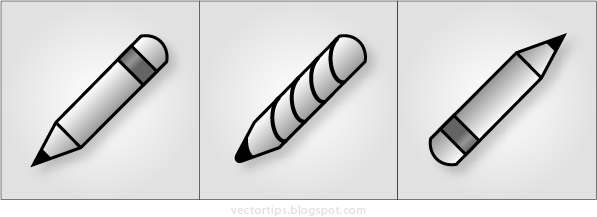
The less popular drawing tools in vector graphic editor, Adobe Illustrator in this case is the Pencil Tools. Unlike the Pen Tools as we describe previously, the Pencil tool normally used to draw some free hand lines, irregular shapes which precision does not matter. Though it is good to see what and how the Pencil Tools in Adobe Illustrator can do.


Pencil tool - Drawing A Line


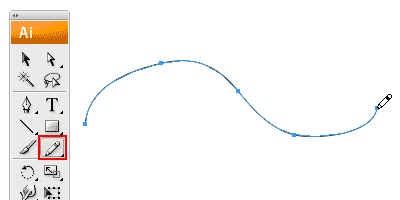
Select the Pencil tool from Tool icon, note that your mouse cursor indicates the pencil tool ready to draw. Now draw by click your mouse (or stylus pen if you're using it), hold and drag to make line shape.


As you can see the line created will have anchor points & stroke - the basic of vector drawing. The anchor points are automatically created by the software engine depends on where the curves you make.


Closing Paths with Pencil Tool


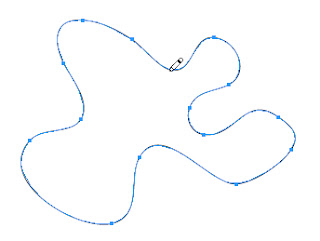
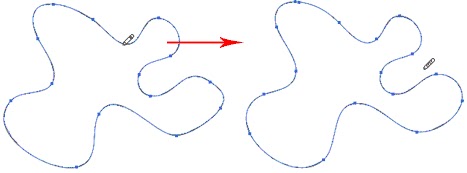
To close a path, hold Alt as your Pencil Tool reaches the start point. A circle icon will appear next to the Pencil Tool to indicate path closure.


From a line, close the path (join back to the first point) and it becomes a compound of a shape.


Smoothing Jaggy Lines


Smooth Tool is used when lines you draw with Pencil Tool looks jaggy. To smoothen the parts that are jaggy, select Smooth Tool or simply hold Alt (Option for Mac) to turn the Pencil Tool to Smooth Tool. Then draw over the area of the lines which you would like to smoothen.


Reshaping Path


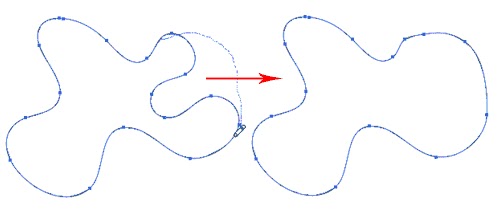
The Pencil tool is also possible to reshape a path line, make sure your path is selected and use the Pencil Tool to redraw the parts you would like to reshape.


Note that the start and end path (show in dotted line, left image above) must be close to the original path to make it work.


Customizing Pencil Tools


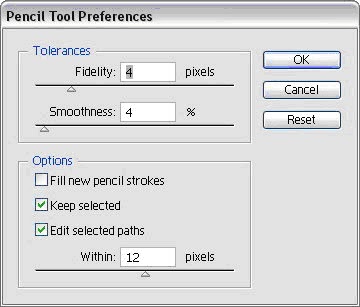
You can turn on the Pencil Tool Preferences by double clicking on the Pencil Tool. You can change the fidelity and smoothness to find a combination that works for you.

Fidelity: Determines how close the path is drawn to your mouse movement. Set it at a higher fidelity if you’re not good at drawing with your mouse.

Smoothness: The higher you set for smoothness, the less anchor point it produces. Thus, producing a smoother line.


Double click on the Pencil Tool to open the Pencil Tool Preference to make some adjustment.


Eraser Tool


Use to delete paths, and most of vector objects. You can experiment the use of Eraser tool with the shape you have been draw.

  • The Eraser tool works based on selection. It will erase only that object selected. If there is no object selected it will erase any valid object it comes in contact with (object type that is erasable). Objects can be on any layer, or in a group, but they must be unlocked.
  • Objects that are not erased by the Eraser tool are: Images, Text, symbols, Graphs, and Gradient Meshes. The preview works on all objects, so it looks like these objects will erase, but on mouse up, they are not changed.
Find out more on Eraser tool here.
author
vectorism
designer, illustrator, founder of vectorise.net