Adobe Illustrator Tutorials Vector Tips & Tricks Search related topics..


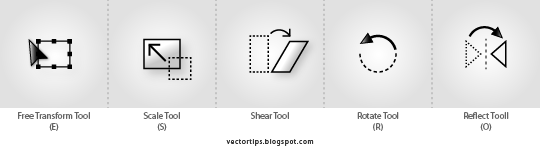
Transform Tools in this tutorials covering the very basic functions as to show how to use the Scale, Rotate, Reflect and Shear. These are most common tools in any vector graphic applications. There are some more advance tools in Transformation but we should explore it later once we master the basic transform.

Scale


To Free Scale objects

Select object, click Free Transform tool (shortcut E), cursor will change, drag corner to freely scale the size. 
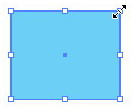

Tips: Hold Shift to scale consistently (proportionate)


To Scale objects by Value %

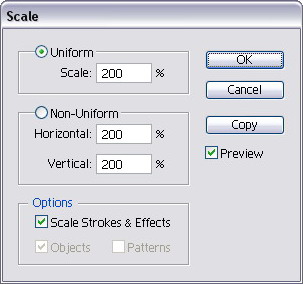
Select objects, double click Scale tool (dialog box appear), set the % value.
or..
Select objects, (Menu) Object > Transform > Scale (dialog box appear), set % value.


Rotate


To Free Rotate objects

Select object, click Free Transform tool (shortcut E), cursor will change, click anywhere outside of the object to freely rotate.
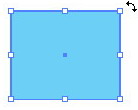
Hold Shift to rotate consistently 45° or 90° to the left or right.

To Rotate objects by Value °

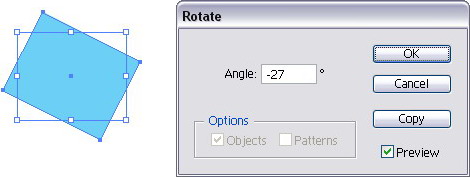
Select objects, double click Rotate tool (dialog box appear), set the ° value.
or..
Select objects, (Menu) Object > Transform > Rotate (dialog box appear), set the ° value.


Move & Duplicate


To Move objects by Coordinate Value

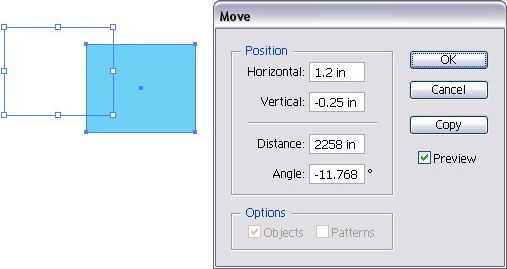
We can accurately move an object from one position to another position instead of dragging an object. Very useful when precision does matter.

Select object, double click Selection tool (dialog box appear), set Hor. & Ver. value, click OK.
or..
Select objects, (Menu) Object > Transform > Move, set the H&V value, OK.
or..
Select object, press Enter on your keyboard, set H&V value, OK. ← i prefer this method ☺


To Duplicate (Copy) objects by Coordinate Value

Note that there is a Copy button in the dialog box, simply click the Copy button to copy (duplicate) the object and the object will be paste onto the new position as the Horizontal & Vertical value set.

To duplicates more from the second copied objects, simply press keyboard Ctrl + D and repeat the action as many as you want.
Illustrator will record your last action - the Copy process with Hor. & Ver. value, so to repeat the last action use Ctrl + D (or in the Menu > Object > Transform > Transform Again').

Reflect


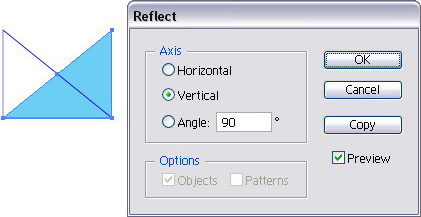
Select object, double click Reflect tool (dialog box appear), set the axis value.
or..
Select object, (Menu) Object > Transform > Reflect (dialog box appear), set axis value.


Shear


To Free Shear object

Select object, click Shear tool start shear by click & drag outside area of the object, the object will follow mouse direction.
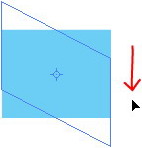
Use your cursor direction where you want the Shear direction to follow.

To Shear object by Angle

Select object, double click Shear tool (dialog box appear), set the Shear Angle.
or..
Select object, (Menu) Object > Transform > Reflect (dialog box appear), set the Shear Angle.
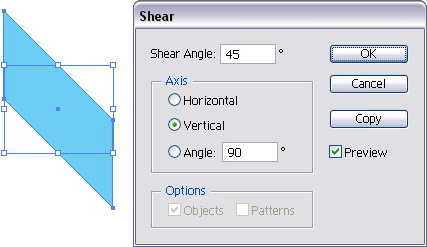


Choose the Axis - Hor., Ver. or by Angle °.

Conclusion

These are most common use of transforming objects in Adobe Illustrator that user will use. Practice always made perfect. You will learn more tips & tricks in your own learning.. keep on sharing..


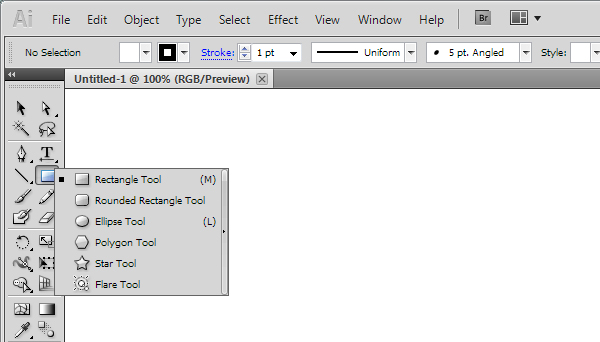
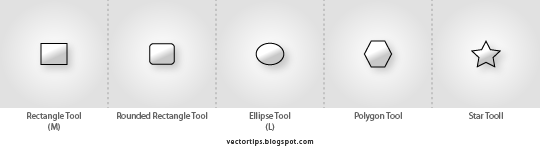
There are some basic shapes available in the Toolbox as shown in the image below. They call it Shape Tools. When you go to the Toolbox and hold the Rectangle Tool, a list of shape tools will expand out for you to pick. We will start with the default Rectangle Tool (the shortcut is M).


The name of the tools show the functions, so try do create some shapes; rectangle, ellipse,etc.

Before we go more on Shape Tools, we need to understand the basic of Vector Graphic that render the 'Shape' - the Fill & Stroke


Understanding Fill & Stroke

  • Fill - color inside the compound shape
  • Stroke - color of the outline shape
Draw a Rectangle as shown below. By default, it has a white fill and black stroke. (Stroke is the border of the shape)

Fill & Stroke color tool


As the image shown here, the Stroke Tool indicated by the square hollowed box (shown here with black color). Fill Tool indicated by solid square (shown here with white color).

As the image shown here, the Stroke is active, as it is on top of the Fill. To change the Fill color, click the Fill Tool first, to make it on top (active).
And the small doublehead arrow is to swap the colors between Fill & Stroke.


Changing Fill Color

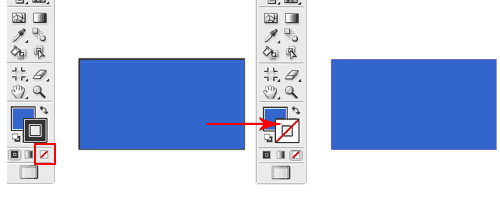
Let’s start changing the Fill color for the rectangle. Double click the Fill from the Tool Palette. It will pop up the Color Picker. Drag the (small triangle) slider to blue and select a deep blue color, click Ok.


Removing Stroke

Click the Stroke in the Tool Palette once to swap it above Fill. Click the None icon boxed up in red to set the Stroke to None. The black stroke will disappear.


Now after we understand the basic element of vector graphic, that Shapes are rendered using Fill & Stroke.. now lets try more on Shape Tools ↓


Constrain Proportions

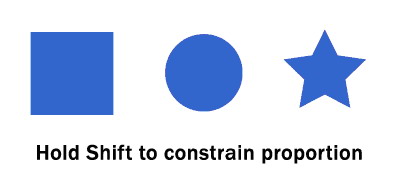
To draw a perfect square, we will select the Rectangle Tool. Hold Shift (keyboard) & drag (mouse) to draw a square. Same for the circle, we will select the Ellipse Tool and hold Shift & drag your mouse to get perfect circle.


Resizing Shapes


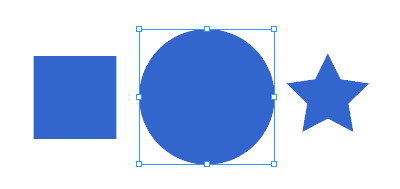
To resize shapes, select the shape using the Selection Tool and a bounding box will appear. Drag the corner anchor point to resize it. To constrain to proportion while resizing, hold Shift as you resize. Also hold Alt/Option if your want to resize from the same position.


Rotating Shapes

Select the shape with the Selection Tool and a bounding box will appear. Move your cursor near the anchor corner and a rotation icon will icon, click and turn it to rotate the square. To snap at 45 degrees increment, hold Shift and turn.


More Options for Shape Tools

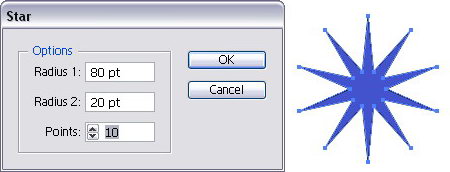
Select the Star Tool. Click once on the artboard and an option will pop up. Enter the values as shown and click Ok. It will draw a star burst shape. This method can be used to create more options for star shape.


Conclusion

All of these basic shapes available in Adobe Illustrator are just basic symmetrical objects / shapes which were constructed with Fill & Stroke that shaped the object itself. This Fill & Stroke is the key in creating ‘vector image’ or ‘vector graphic’ (the shape / object itself). We will learn more on Fill & Stroke later as well as creating different objects and more complex shapes. This process will include the using of most popular drawing tools for vector graphic software - the Pen Tool.


SELECTION TOOLS


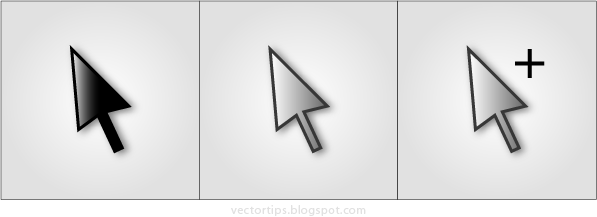
There are 3 types of selection tool in Adobe Illustrator used to select objects or shapes. I prefer to name it as follows:


Black Arrow


Selection Tool (V)
  • Select the whole object / shape
  • Select grouped objects
  • Select object(s) to re-size / rescale the object(s)
     

White Arrow


Direct Selection Tool (A)
  • Select 'path' segment of an object / shape
  • Select 'anchor point' of an object
     

White Arrow +


Group Selection Tool
  • Select the whole compound of an object / shape
  • double click will Select grouped objects
     
Note:
I prefer to ignore the name given by adobe illustrator, it sounds confusing users.. just mention Black Arrow, White Arrow & White Arrow + (plus) instead..


How To Use It


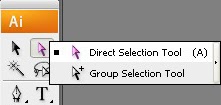
First we need to get familiar where these Selection Tools in Adobe Illustrator work space. As you can see (in your Adobe Illustrator) there are only 2 Arrow icons shown; the Black Arrow & White Arrow shown.. and there is a small triangular dot at White Arrow tool icon to indicates there is another tool hidden - simply click & hold for 2 seconds to show another White Arrow + tool. So we get 3 Selection Tools..


Black Arrow (V) to select the whole objects or the grouped objects.

Use White Arrow (A) to select an anchor point or a path segment of an object, used to edit the anchor point of the object.

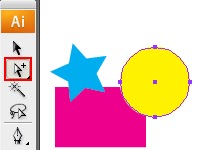
White Arrow with + to select a whole compound of an object. What's the different (compared to Black Arrow) is, if the objects was grouped, it will only selects one compound of a shape.
Tips: To select the whole group, you don't need to change to Black Arrow, simply double click one of the object and it will select the whole group just like the Black Arrow.


ZOOM & HAND


Zoom Tool (Z)


Select in toolbox for zoom in & zoom out.

for zoom in :

  1. click on image, or
  2. click (hold) & drag over the image

  1. fast shortcut for zoom in without deselecting other tools, (with other tool active), keyboard Ctrl + Spacebar hold & zoom in then release keyboard.

for zoom out :

  1. click on image
  2. fast shortcut for zoom out without deselecting other tools, (with other tool active), keyboard Ctrl + Alt + Spacebar hold & zoom out then release keyboard.
  3. zoom 100% = double click or keyboard Ctrl+1
  4. zoom all = double click or keyboard Ctrl+0

Hand Tool (H)


To scroll the artboard around without using vertical / horizontal scrollbar.

    1. Toolbar - select
    2. Click on any area & drag to move the document around.
    3. Fast shortcut for hand without deselecting other tools, (with other tool active), keyboard Spacebar (hold), cursor will change to , click (mouse) & drag document.


      Previous - 02 Getting Started | Next - Drawing Basic Shape →


      This tutorial, we will look at the Illustrator Work Space, the Tools and Palette that commonly used in working with Illustrator. So first, create a new document, study the environment - the Tools on the left, Palette on the right and Control Panel on the top. But most important are the Tools (left) & Palette (right).


      WORKSPACE - TOOLS, PALETTE


      Create New Document


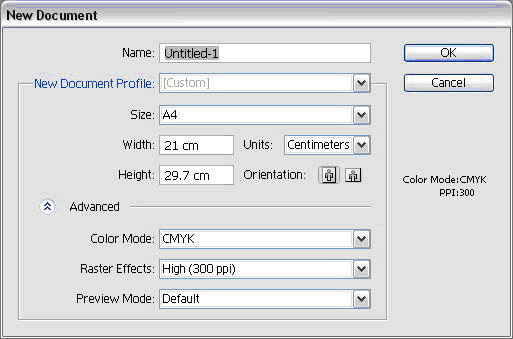
      Go to File > New Document to create your first document. Type in a Name for the document and click Advanced to select RGB for Color Mode as we will be working for the screen. Click Ok after that.

      Note :
      • CMYK Color Mode - for printing job purpose (i.e. brochure, letterhead, name card, etc.)
      • RGB Color Mode - for jobs to be displayed on screen (i.e. for website design, video editing)
      • Size document (A4 as shown above) will be the artboard size for the new document
      • Set the Units – points / inches / mm / cm, etc.
      • Orientation either portrait or landscape
      • Size, Units & Orientation can be changed at anytime in the middle of your works, go to File > Document Setup

      Illustrator Workspace


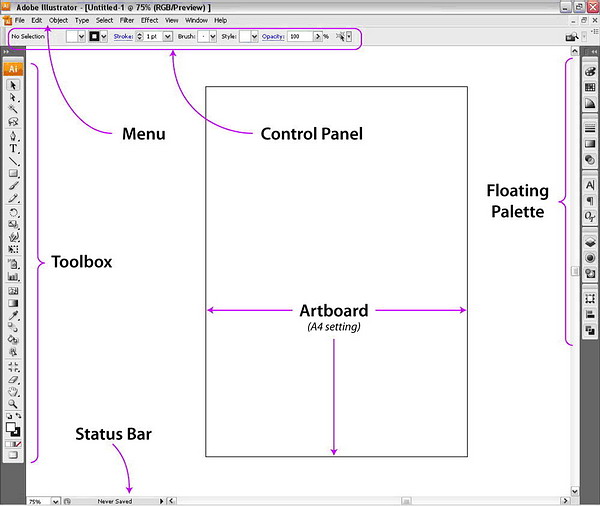
      You’re advised to familiarize the Illustrator Workspace, there are 4 main features of the workspace besides the canvas itself.

      1. Toolbox - the tools that we will used

      2. Menu - the standard features for any applications

      3. Control Panel - display the properties of selected tools & artworks

      4. Palette - Holds the properties of the artworks - to modified, change colors, stroke, etc.

      Toolbox


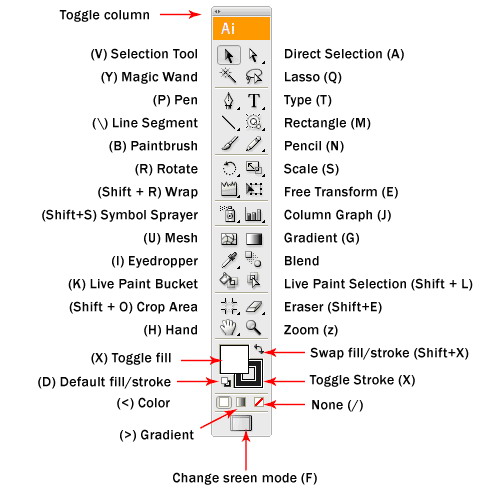
      This is the handy toolbox which we will use most often. By default, it comes in one single column (collapse) as shown in the screenshot above. To switch it back to the old style 2 columns toolbox, simply click the top left mini arrow >> to toggle it into 2 columns. Some of the tools like Rectangle have more tools hidden. To expand, just click and hold the icon to reveal all the similar tools under that group.


      Expandable Tools indicated with small arrow


      Click & hold the selected tool to expand the extra tools


      Toolbox with 2 columns view, the functions & the shortcuts indicated in bracket.

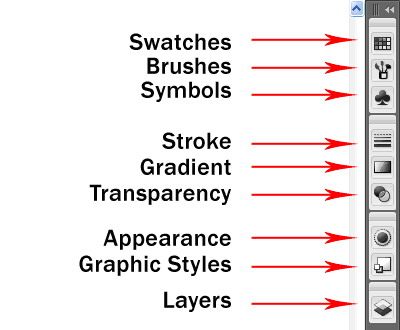
      Floating Palette


      This is the floating palette which contains properties for our artworks. It is commonly used for changing colors, stroke width, artworks size, effect, etc.


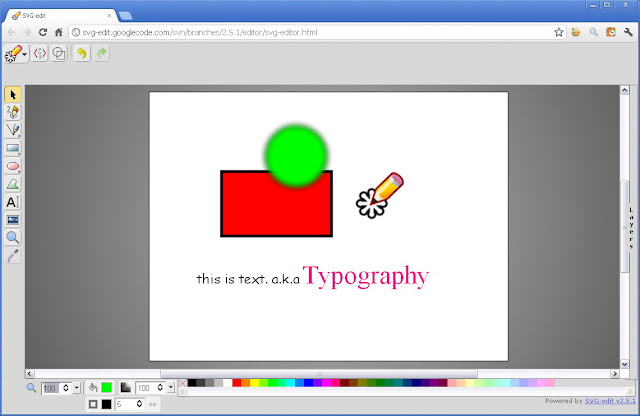
      SVG or Scalable Vector Graphic is the only vector graphic or vector image that has the ability to appears on screen, online. Unlike other vector graphics format sucah as Ai, CDR, EPS that unable to be appear live onscreen in the internet, just a link instead. Except SWF or flash format, but the different is SVG is 'static vector image' and SWF (flash) format are normally video or animation and the good point is SVG image that shown online are downloadable. Here is one of SVG editor project by a SVG-edit group using free Google code service, an open source for developer.


      This open source SVG-edit project was driven by javascript (JS), HTML5, CSS and SVG.. yes sounds so internet because this is an online version of SVG-edit. just make sure you're using modern web browser to launch the site. You can find the download version via their Project Home. Since I'm an Adobe Illustrator user, I don't use it for my vector edit, so I prefer you try it yourself. Still it's a good program for fast and light editing for web vector.

      Let see the features it offered:
      • Free-hand drawing
      • Lines, Polylines
      • Rectangles / Squares
      • Ellipses / Circles
      • Polygons / Curved Paths
      • Stylable Text
      • Raster Images
      • Select / Move / Resize / Rotate
      • Undo / Redo
      • Color / Gradient picker
      • Group / Ungroup
      • Align
      • Zoom
      • Layers
      • Convert Shapes to Path
      • Wireframe Mode
      • Save drawing to SVG
      • Linear Gradient Picking
      • View and Edit SVG Source
      • UI Localization
      • Resizable Canvas
      • Change Background
      • Draggable Dialogs
      • Resizable UI (SVG icons)
      • Open Local Files
      • Import SVG into Drawing
      • Connector lines and Arrows
      • Plugin Architecture
      • Smoother freehand paths
      • Editing outside the canvas
      • Increased support for SVG elements
      • Add / Edit Sub-paths
      • Multiple path segment selection
      • Support for foreign markup (MathML)
      • Radial Gradients
      • Configurable Options
      • Eye-dropper tool
      • Stroke linejoin and linecap
      • Export to PNG


      Well not bad, though the program interface seems very basic. I intended to compare it with some of other free Vector Editor available online. Perhaps next time I'll try to make some basic comparison in features, let me collect some other free vector editor first. Anyway go to their Project Home SVG-edit and for Short Introduction to learn more.


      credit: ehmdunque.altervista.org
        author
        vectorism
        designer, illustrator, founder of vectorise.net