Adobe Illustrator Tutorials Vector Tips & Tricks Search related topics..

Showing posts with label Drawing Tools. Show all posts


Previously a friend asked, how to create box packaging in Illustrator. So we try to make a very basic way to make a box packaging using Adobe Illustrator CC. Based on a typical rectangular box shape as white box image shown above, here is the video tutorial.


Please set the video to play in HD quality to clearly see the tools and the menu used.


This simple tutorial we manage to capture on how to create round text for one of our clients. Sorry for the silent video :D


Watch it in HD quality to follow step by step.. feel free to ask anything related to the tutorial title in the youtube comments or in the comment box below. Remember to subscribe the youtube channel too.. enjoy..


Dealing with artwork tracing from jpeg image to vector, such as trace logo from jpeg image is common to graphic or visual designer. The real problem that we, as designer often facing are not the complicated artwork itself, but to find the correct font used in the artwork.


Let say a client request to vectorise a logo (to convert or trace from jpeg image to vector illustration) for their company or product, when the owner of the logo itself don't know the font name used in the logo, the designer have to find it out to use the font as the text in the logo artwork.

After hours wasting time searching for the correct font used with negative result, we may end up with a decision to trace the font text instead.. and here we share some of our font tracing tips to make the complicated job a bit faster & easier.


Hope you find it useful and can apply for your tracing works. If you have question, you can ask via youtube comment or in the comment box below.. enjoy..

Please subscribe the video channel & remember to share ;)


Some user asked us how to draw or we usually say it vectorize jpeg image with Adobe Illustrator. Well we try to do some video tutorials here.. sorry for no audio yet. Next time we will try to add audio features on our next video tuts.


Notice that the image (jpeg) is put on bottom Layer, and lock it to avoid it moved.. and we create new Layer 1 on top of it, make sure to Select this Layer 1 to work on it.

Considering you know how to use Pen Toll, you can see our previous post on how to use Pen Tool tutorial..


The less popular drawing tools in vector graphic editor, Adobe Illustrator in this case is the Pencil Tools. Unlike the Pen Tools as we describe previously, the Pencil tool normally used to draw some free hand lines, irregular shapes which precision does not matter. Though it is good to see what and how the Pencil Tools in Adobe Illustrator can do.


Pencil tool - Drawing A Line


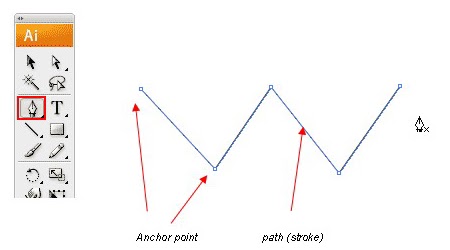
Select the Pencil tool from Tool icon, note that your mouse cursor indicates the pencil tool ready to draw. Now draw by click your mouse (or stylus pen if you're using it), hold and drag to make line shape.


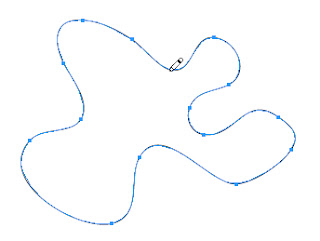
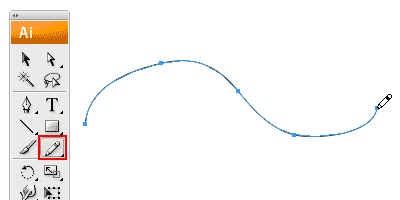
As you can see the line created will have anchor points & stroke - the basic of vector drawing. The anchor points are automatically created by the software engine depends on where the curves you make.


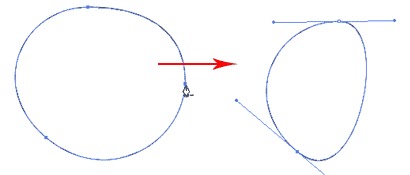
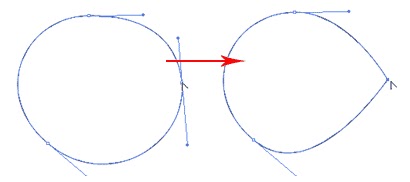
Closing Paths with Pencil Tool


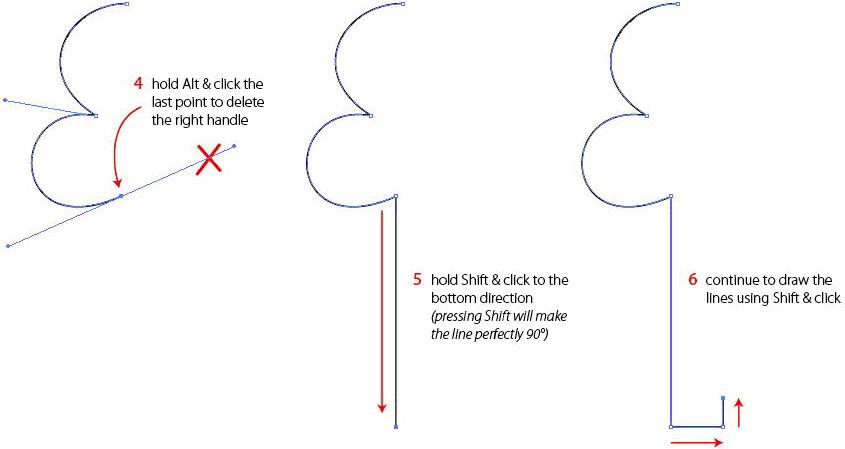
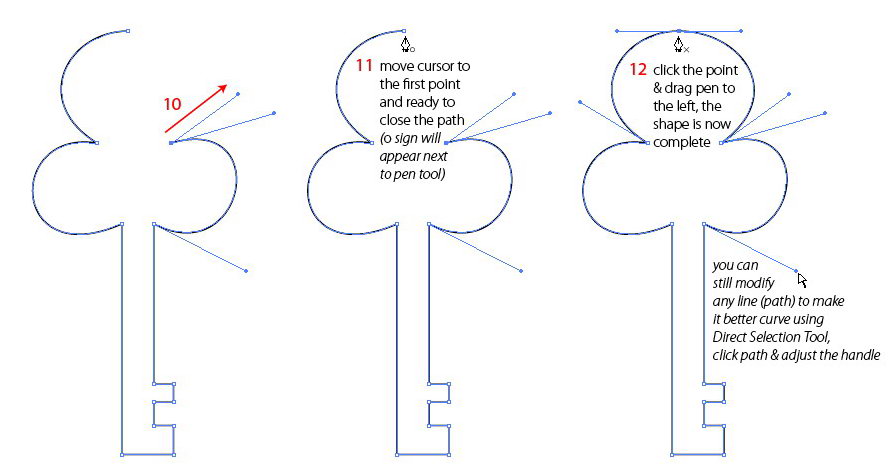
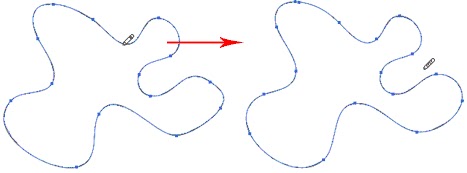
To close a path, hold Alt as your Pencil Tool reaches the start point. A circle icon will appear next to the Pencil Tool to indicate path closure.


From a line, close the path (join back to the first point) and it becomes a compound of a shape.


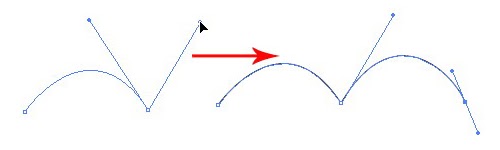
Smoothing Jaggy Lines


Smooth Tool is used when lines you draw with Pencil Tool looks jaggy. To smoothen the parts that are jaggy, select Smooth Tool or simply hold Alt (Option for Mac) to turn the Pencil Tool to Smooth Tool. Then draw over the area of the lines which you would like to smoothen.
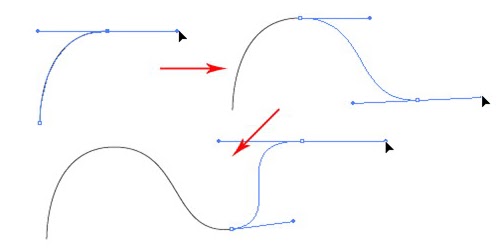


Reshaping Path


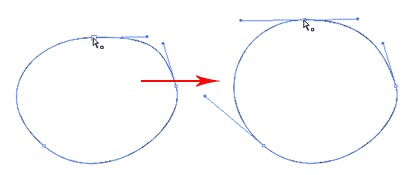
The Pencil tool is also possible to reshape a path line, make sure your path is selected and use the Pencil Tool to redraw the parts you would like to reshape.


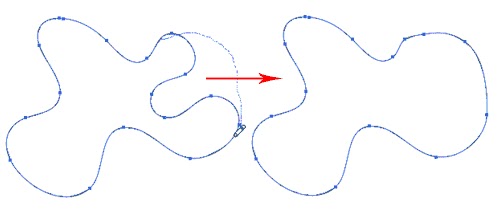
Note that the start and end path (show in dotted line, left image above) must be close to the original path to make it work.


Customizing Pencil Tools


You can turn on the Pencil Tool Preferences by double clicking on the Pencil Tool. You can change the fidelity and smoothness to find a combination that works for you.

Fidelity: Determines how close the path is drawn to your mouse movement. Set it at a higher fidelity if you’re not good at drawing with your mouse.

Smoothness: The higher you set for smoothness, the less anchor point it produces. Thus, producing a smoother line.


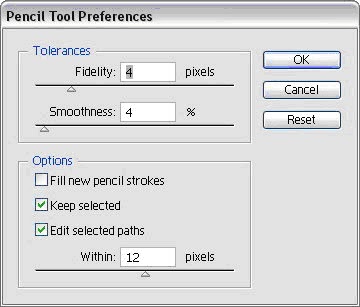
Double click on the Pencil Tool to open the Pencil Tool Preference to make some adjustment.


Eraser Tool


Use to delete paths, and most of vector objects. You can experiment the use of Eraser tool with the shape you have been draw.

  • The Eraser tool works based on selection. It will erase only that object selected. If there is no object selected it will erase any valid object it comes in contact with (object type that is erasable). Objects can be on any layer, or in a group, but they must be unlocked.
  • Objects that are not erased by the Eraser tool are: Images, Text, symbols, Graphs, and Gradient Meshes. The preview works on all objects, so it looks like these objects will erase, but on mouse up, they are not changed.
Find out more on Eraser tool here.


There are 2 types of Drawing Tools in most vector graphic applications, the Pen Tool and Pencil Tool. Others include Paintbrush Tool, Line Segment Tool, Eraser Tool and etc. But we will focus on the most important tool in drawing vector graphic - the Pen Tool.


Pen Tool

The most important tool in any Vector Graphic programs is the Pen Tool. Pen Tool creates path (stroke) from point to point.


Drawing Straight Lines

Select the Pen Tool and click once to add the first anchor point. Move your mouse to the next position and click again to create the second point. The two anchor points will be connected together. Continue doing this to create a W shape as shown. To draw a new line, click the Selection Tool (the black arrow tool) and click back the Pen Tool again.


Closing a Path

To close a path, click back the starting point to close the shape.


Notice that when you want to close the path, the cursor (pen tool) will appear a small ‘o’ next to the pen tool - close path indicator.

Drawing a Curved Line

Click and drag to put out the handles to create a smooth anchor point.


Changing Path Directions

Click and drag to create a smooth anchor point. Without releasing your mouse, hold Alt and drag the handle up to change the path direction.


Drawing a Circular Path

Click and drag to create a smooth anchor point. Continue adding points and click back the starting point to close the path.


Adding Anchor Points


With the Pen Tool selected, go near the path where you want to add a new anchor point. + sign will appear next to the pen, click on the path to create a new anchor point.


Removing Anchor Points


To remove point, move your Pen Tool close to an anchor. - sign will appear next to the pen. Click on the anchor point to delete it.


Converting Anchor Points


To convert a smooth anchor point to a sharp anchor point, move your Pen Tool near the anchor and hold Alt and your Pen Tool will change to an arrow shape. Click on the smooth anchor to convert it to an anchor point. Click and drag on the anchor point again to change it back to a smooth anchor point.


Moving Anchor Points


Select the Direct Selection Tool and click and on anchor you want to move. Click and drag to change positions.


Changing Anchor Points


With the Pen Tool, you can quickly change the anchor directions. Hold Ctrl to quickly change the Pen Tool to Direction Selection Tool. Select the anchor point you want to edit. The anchor handle will appear. Now release Ctrl and hold Alt to change it to Convert Anchor Tool. Click and drag the handles to change the direction.


Drawing a Key Shape


After learning the concepts of how the Pen Tool works, lets draw a key shape. For the right angles (90°), hold Shift before adding anchor point to constrain it to 90-degree.


Tips for Using Pen Tool

  • Use as little anchor points you need to create your shape. Less anchor points make smooth curve
  • Add anchor points where there is a change in direction of the line/curve
  • Use shortcuts like Alt or Ctrl to quickly swap to other tools to edit your path
  • Hold shift to lock your path while adding new anchor point for 45° or 90° increments
author
vectorism
designer, illustrator, founder of vectorise.net