Pathfinder is another important tools in Illustrator especially when we need to create vector logo or illustrations when Pen Tool not really helps. Adobe Illustrator Pathfinder panel consists of 10 tools to manipulate vector objects. To using it, there must be at least 2 objects (or more) selected and overlapped between them to be manipulated with Pathfinder tool.

Open pathfinder panel, Window > Pathfinder (Shift+Ctrl+F9).

Pathfinder Panel

Experimenting Shape Modes & Pathfinders

There are 2 categories in the Pathfinder panel, the Shape Modes and the Pathfinder, we will explain
these 2 different categories later, for not making beginner confused. As beginner, just consider all the
tools are Pathfinder.

1. Draw 2 objects, as shown below, we use basic shapes - a green square at the Back (bottom), and a
red circle at the Front (on top). Or any object shapes you like, just make sure they’re overlapped.


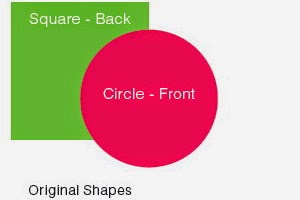
2. Select the objects, and do with all the Pathfinder tools to understand how the effects resulted.

Shape Modes


ORIGINAL SHAPES PATHFINDERS TOOLS RESULTS

Unite merges both selected objects following the top object.


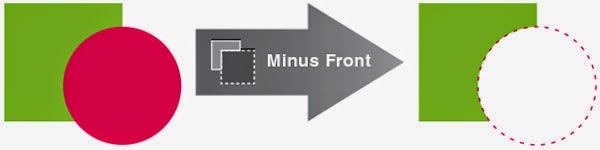
Minus Front removes the front (top) object.


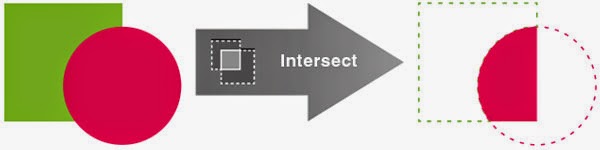
Intersect removes other portions and remain the intersect (overlapped) portions.


Exclude removes overlapped portions and remain the other portions. (contra to Intersect)

Note:
Shape Modes - use these 4 tools with Alt+click, where you have the option to Expand it to permanent effect or No Expand (temporary effect):

Pathfinder


ORIGINAL SHAPES PATHFINDERS TOOLS RESULTS

Divide breaks the all the overlapped selected shapes into separated pieces.


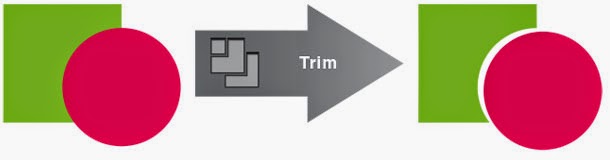
Trim breaks & removes the overlapped portions underneath of the top shape.


Merge for different color shapes will be similar as Trim effect.


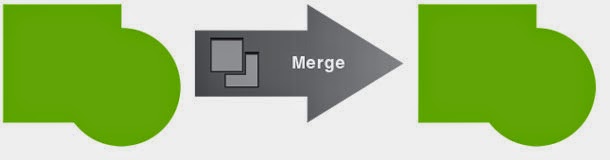
Merge for similar color shapes will be similar as Unite effect, (same color will merge as 1 single shape).


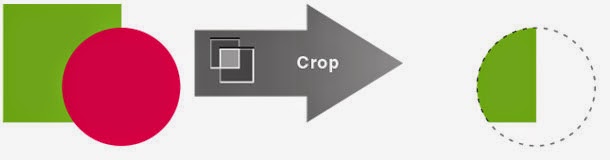
Crop will make the top shape as the masking for any shapes below it,and will removes any portion outside it.


Outline breaks & converts all the shapes into separated strokes.


Minus Back remove shapes below (of the top shape) and remove the overlapped portions.


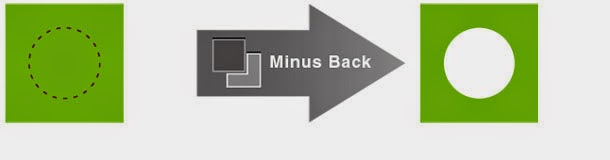
Another example of Minus Back, a smaller circle placed under this square shape..
..and the results, Minus Back removes the overlapped shapes underneath, a hole of circle.


So these are the basic of Pathfinder that we can apply for in creating artworks. Mastering these tools really helps in making illustration or vector works simpler and faster, no much Pen Tool needed. You will appreciate it if you got it..


As you know Adobe Illustrator provides Star shape tool to create star object, but the problem is the default Star shape looks fat. You need just a simple normal or perfect star. Then here I show you the simple way to draw perfect Star.


In your Adobe Illustrator artboard, go to the Toolbox and hold the Rectangle Tool, a list of shape tools will expand out for you to pick and click on the Star Tool.


Now the Star Tool activated and you're ready to draw Stars, but before that, its good to know that there're 2 ways to create Star:

1. To draw a Star with custom Size & Points:

Click once on artboard, a dialog box will appear with 2 Radius settings and a Points value:


  • Radius 1 = outer corner (measured from center)
     
  • Radius 2 = inner corner
     
  • Set the Points value to determine how many corner for the Star

A Star will be created according to your value settings.

2. To draw a Star with normal click & drag:

This is the common way designers created Stars in Illustrator, but pay attention on how to get the perfect Stars.

  • Click & drag to draw random orientation Star ↓


  • Press Shift while click & drag to draw ‘perfect standing’ Star ↓


  • Press Alt while click & drag to draw ‘perfect’ Star shape ↓


  • Press Shift+Alt while click & drag to draw ‘perfect standing’ of a ‘perfect’ Star shape ↓


  • Press Ctrl while click & drag to draw a changing shapes of Star,
    (it change shape while you drags it) ↓


So now you know how to create Stars for your design works..


As the name given, Illustrator Type Tool is to type text and it also has sets of 7 typing tools with their own functions. Click & hold on Type Tool icon to show another 6 type tools.


Shown here is the Adobe Illustrator CC Type Tool - click & hold the icon to show all the 7 sets of type tools.

We will try to focus more on these top 3 tools:
  • Type Tool
  • Area Type Tool
  • Type on a Path Tool
The other tools (except the new Touch Type Tool) are similar with the top 3 tools, just in vertical orientation.
..

Type Tool

1. Normal text

To type normal text on artboard. Click Type Tool or shortcut T and click on empty area on artboard.


Note:
The text will be free flow as you type, press Enter to break to second line or to make new paragraph.

2. Text Box

To type text in a compound box so that the text will only fixed in the box.
Click Type Tool or (T), click & drag a box with desired size on empty area on artboard, and start typing. This is similar with the next tool - Area Type Tool.
A


← The box made by dragging the Type Tool, and type. Text will only visible with the box size.
Note:
To resize the box, use Selection Tool (black arrow) and pull out one of the box’s side. Do not use Free transform, your text will distorted.


Area Type Tool


To type text in a compound box so that the text will only fixed in the box.
Create a box or any shape, use Area Type Tool and click on the path of the box or the shape.

1.

With Area Type Tool, click on the path of the box or shape area, and you’re ready to type.
..

2.

This small red square mark indicates there are hidden overflow text inside the box. Resize the box area to see full text.
..

3.

Use Selection Tool  (black arrow) and drag the middle small square, to resize the box area to show overflow hidden text.
..

Area Type Tool - Options

You can customise Area Type Tool with option settings, like to make the Text Box with 2 or more rows or make it 2 or more columns complete with gutter (spacing) settings.

1. Make an empty box and use Area Type Tool to click on the path of the box.

..

2. Start typing your contents.


..

3. With the text box still selected, double click the Area Type Tool    icon to show the Options.


..

4. Add Rows
  • Rows: 2
  • Gutter: 0.25 inch
 
..

5. Add Columns
  • Columns: 3
  • Gutter: 0.15 inch
  • Span: 0.9 inch
    (Span is automatically set, when we set the Gutter value)


Type on a Path Tool


To create a Text that follows a path shape.
Draw a curvy path using Pen Tool (P), use Type on a Path Tool & click on the path.

1.


Draw a curved path line and use Type on a Path Tool    to click on the path, and start type.
..

2.


The text will follow the path shape. Once done, deactivate it using (click)  Selection Tool 
Set the text Paragraph to Align center.
..

3.


Using Selection Tool, you will see there are ‘controller handles’ on both sides & in the middle.
These handles can be drag to control the text flow.
..

4.


So the text moves and fill the path nicely. Now use Selection Tool    to drag the middle handle controller downward.
..

5.


The text flip downward, this is usefull for Type on a Path of a Circle - Outside text or Inside text.
Or..
You can also use Type on a Path Options. Make sure the type on path is selected, double click on icon    to open the setting.


Tick the Flip & Preview, done.
..

6. Text Outside


Same method with Step 4 - 5 above for Type on a Circle Path, use ‘black arrow’ (Selection Tool) to drag middle handle
..

7. Text Inside (Flip)


The text Flipped inside.
..

8. Rotate


Drag the ‘middle handle’ along the path to move the text to the bottom..
Or..
Just Rotate the circle 180ยบ.
..

So these are the most common used for Type tools in Illustrator since the previous versions. For the new Touch Type Tool, I will add in here next time, hopefully.
author
vectorism
designer, illustrator, founder of vectorise.net